Editing Part B Content and Structure
Aug 5, 2015 5682 Print this page Download PDF Request support
The Part B function (Proposal > Part B at the proposal stage or DoW > Part B at the implementation stage) is an authoring tool for collaborative document composition and content editing.
By using this function you can compose the structure and content of Part B (of the Proposal or the Description of Work). By default Part B consists of content elements based on your project type. A descriptive part of a content element will contain a heading and text. Within the text field you have the option of including paragraphed text, bullet points, tables, and / or images. There are also auto-generated content elements such as the Work Package List and the Budget Overview Table.
EMDESK enables users to work on different content elements at the same time, but descriptive content elements can be edited by only one user at a time. Each time a user saves their changes to a content element, these changes are tracked and displayed in the history, so you can revert back to a former version of a content element at any time.
When exporting the Proposal to a DOCX file, the latest version of each content element is consolidated into one document according to the structure.
Re-structuring the Content Elements
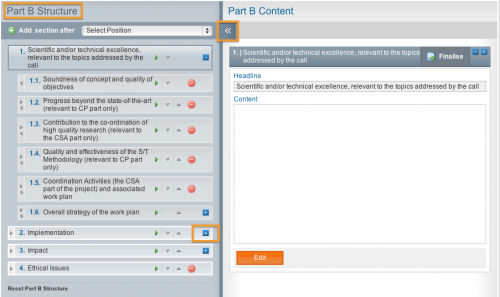
Upon entering the Part B section of EMDESK you’ll see a default structure according to your selected project type. Please note that only a user owning Coordinator Rights can add or delete content elements, or change the order of content elements. Regular users having Contractor Rights are only allowed to edit the content and headings of each content element.
Navigate through the Structure and Content Elements
The navigation panel can be found on the left hand side of your screen. The navigation panel shows the documents structure and lets you navigate to specific content elements. By clicking on the ![]() of each heading, you can expand the element to show sub-level headings.
of each heading, you can expand the element to show sub-level headings.
By clicking on a headline, you can open the corresponding content element. The editor will open on the right hand side in review mode (read-only). You can open as many content elements as desired.
You can also hide the navigation pane by clicking the button ![]() at the upper right corner.
at the upper right corner.
Add, Move and Delete a Content Element
To add a new content element, please select the heading from the drop down menu Select Position and click ![]() . The new content element will be inserted after the selected heading. To delete a content element, click
. The new content element will be inserted after the selected heading. To delete a content element, click ![]() .
.
You can also add a new content element directly after the last content module of a parent element by clicking on the dotted line.
To move a content element up or down within the structure, please click the relevant button ![]() . A content element can be moved up/down within its parent content element only. To move content elements to another level or a parent content element, please use the indent/outdent arrows
. A content element can be moved up/down within its parent content element only. To move content elements to another level or a parent content element, please use the indent/outdent arrows ![]() in combination with the up/down buttons
in combination with the up/down buttons ![]() .
.
Edit a Content Element
To edit one or more content elements click once on the respective headlines to activate the editor box. Note this will be in read-only mode.
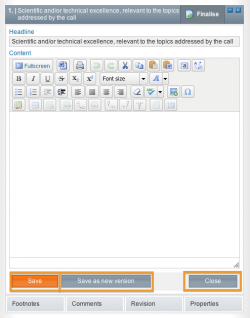
To edit a content element, click the edit button ![]() underneath the content box. Note that once you are in edit mode this content cannot be edited by any other users. To release the content and allow it to be edited by users by clicking the close button
underneath the content box. Note that once you are in edit mode this content cannot be edited by any other users. To release the content and allow it to be edited by users by clicking the close button ![]() .
.
Click the save button ![]() to save your changes. Please note that you will need to save the changes as a new version if you want the changes to be tracked. Changes are only tracked when you click
to save your changes. Please note that you will need to save the changes as a new version if you want the changes to be tracked. Changes are only tracked when you click ![]() . If you are not the author of the latest version, there is only the option to save the changes as a new version. Only users with Coordinator Rights are permitted to overwrite the latest version.
. If you are not the author of the latest version, there is only the option to save the changes as a new version. Only users with Coordinator Rights are permitted to overwrite the latest version.
To dismiss any changes, simply click the close button ![]() .
.
Please note that some content elements, for example, the Work Package list, are auto-generated parts that are created for export and cannot be edited manually via the editor.
Insert Images and Figures – Media Manager
It’s not possible to paste images directly into the editor. First you need to convert your images to .jpg, .gif or .png files and upload them to the media manager.
To add one or more images to the Media Manager enter a content element and click on “Edit”. Once in edit mode click on the image icon ![]() in the editor. You can then upload one or more images to the online media library. After the images have been added to the Media Manager you can insert them into a content element. To do this, open the content element you wish to add an image to > put your cursor where you’d like the image to be inserted > Click on the Media Manager button in the editor toolbar > select the image you’d like to use from the Media Manager > Use image. You can add a caption to the image by hovering over the top of the image to activate the caption field.
in the editor. You can then upload one or more images to the online media library. After the images have been added to the Media Manager you can insert them into a content element. To do this, open the content element you wish to add an image to > put your cursor where you’d like the image to be inserted > Click on the Media Manager button in the editor toolbar > select the image you’d like to use from the Media Manager > Use image. You can add a caption to the image by hovering over the top of the image to activate the caption field.
You can delete images in Media Manager by first opening the Media Manager as described above, selecting the image and clicking on the “Delete Image” button.
Related Articles
-
Managing Revision of Content Elements
April, 13 2012 2
-
6.4 Inserting and Editing Comments
April, 10 2012 4
-
6.3 Inserting and Editing Footnotes
April, 7 2012 4
-
6.2 Editing and Formatting Content
April, 4 2012 4