Design and Structure the Work Plan
Oct 19, 2015 14180 Print this page Download PDF Request support
To create and manage the work plan, go to Proposal > Work Plan > WP Structure during the proposal writing and to DoW > Work Plan > WP Structure during the implementation phase.
Here, you can structure the work plan into 3 levels at maximum, sub-projects, work packages and tasks. For each activity you can define the title and the lead contractor. At the task level – the lowest level – you define plan start and end.
All users can see the activities – e.g Sub-Projects, WPs and tasks in the work plan. However, only the users with Coordinator Rights can create and edit all items, while users with Contractor Rights can create new activities under parent activities and edit only those activities (incl. sub-level activities) that their contractor is leading.
Optionally you may classify activities into types e.g. IA, RIA. RTD, MGNT, etc. (in FP7 known as activity types). Activity types are labels that help you structure your work plan and budget. You can use one or more labels. The activities e.g. work packages are colour coded to indicate activity types. Learn more on how to use activity types here.
Manage Work Package (WP)
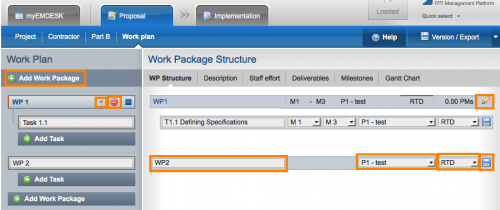
To create a work package, click on ![]() at the top of the left panel. A work package is created and added to the end of the work package list on the right.
at the top of the left panel. A work package is created and added to the end of the work package list on the right.
Click the ![]() icon on the work package to edit its properties:
icon on the work package to edit its properties:
- The work package ID is auto-numbered, however, you may change it to an individual ID per each work package
- Enter the work package title
- Select the Leading Contractor (all users assigned to the leading contractor have edit access to the work package and sub-level tasks)
- Optionally, you may classify the work package to another activity type
- Then click on
 to save
To delete a work package, click the ![]() icon on a work package item. Note that all information associated with the work package will be deleted irreversibly e.g. work packages properties, sub-level tasks, cost entries, person-months, deliverables and milestones. When deleting a work package during implementation phase, also all reporting data on the work package and associated tasks will be deleted.
icon on a work package item. Note that all information associated with the work package will be deleted irreversibly e.g. work packages properties, sub-level tasks, cost entries, person-months, deliverables and milestones. When deleting a work package during implementation phase, also all reporting data on the work package and associated tasks will be deleted.
To move or change the order of the work packages, click the ![]() icon in the list on the left to move items either upwards or downwards.
icon in the list on the left to move items either upwards or downwards.
Note that the plan start and end of a work package is auto-set to the plan start month of the earliest beginning sub-level task and the end month of the latest ending sub-level task.
To stop a work package from running during implementation, simply adjust the plan end month of all sub-level tasks to a month in the past.
Manage Tasks
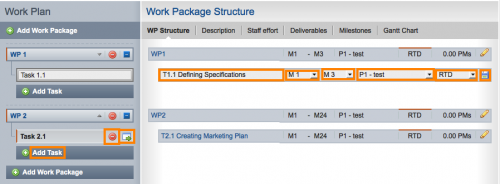
To add a task to a work package, click the ![]() button. A task is created and added to the end of the tasks of this work package.
button. A task is created and added to the end of the tasks of this work package.
Click the ![]() icon on the taske to edit its properties:
icon on the taske to edit its properties:
- The task ID is auto-numbered, however, you may change it to an individual ID per each task
- Enter the task title
- Define the plan start and end
- Select the Leading Contractor (all users assigned to the leading contractor have edit access to this tasks)
- Optionally, you may classify the task to another activity type
- Then click on to save
To delete a task, click the ![]() icon on a task item. Note that all information associated with the task will be deleted irreversibly e.g. task properties and person-months. When deleting a task during implementation phase, also all reporting data on the task will be deleted.
icon on a task item. Note that all information associated with the task will be deleted irreversibly e.g. task properties and person-months. When deleting a task during implementation phase, also all reporting data on the task will be deleted.
To move or change the order of the task, click the ![]() icon in the list on the left to move items either upwards or downwards within the work package. To move the task to another work package, click the
icon in the list on the left to move items either upwards or downwards within the work package. To move the task to another work package, click the ![]() icon on the task. A dialog box will appears: Select the new work package and confirm.
icon on the task. A dialog box will appears: Select the new work package and confirm.
To stop a task from running during implementation, simply adjust the plan end month of task to a month in the past.
Working with Sub Projects
EMDESK allows you to group your work packages into sub projects.
To add a Sub-Project, click on the dotted line ![]() between the work packages to group the work packages below the line into a Sub-Project.
between the work packages to group the work packages below the line into a Sub-Project.
To delete a Sub-Project, click on the ![]() button. Unlike the connection between work packages and tasks, deleting a Sub-Project does not affect any other elements and simply ungroups the work packages.
button. Unlike the connection between work packages and tasks, deleting a Sub-Project does not affect any other elements and simply ungroups the work packages.
Note that the plan start and end of a sub-project is auto-set to the plan start month of the earliest beginning sub-level work package and the end month of the latest ending sub-level work package.
Gantt Chart
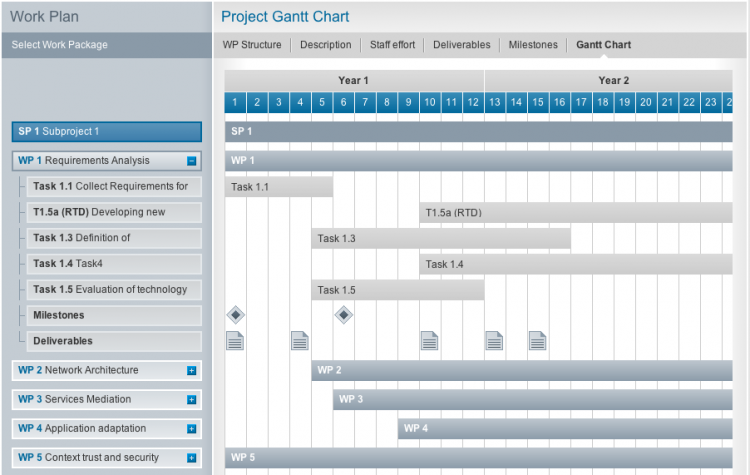
On Proposal > Work Plan > Gantt Chart during proposal writing or DoW > Work Plan > Gantt Chart once the project is in Implementation mode, you can view the project plan and timing in a Gantt chart.
The timeline provides you with a graphical overview of the Work Packages, Tasks, Deliverables/Work Documents and Milestones with their timings along the project duration.
Click on the ![]() to expand a Work Package and to view sub-level Tasks, Deliverables/Work Documents and Milestones. For further information on a Milestone or Deliverable, please click on the
to expand a Work Package and to view sub-level Tasks, Deliverables/Work Documents and Milestones. For further information on a Milestone or Deliverable, please click on the ![]() or
or ![]() buttons within the chart.
buttons within the chart.
Related Articles
-
Description of the Work Plan
January, 1 2015 3
-
Resources Allocation (Plan Staff Effort)
January, 1 2015 2
-
Schedule and Manage Deliverables
January, 1 2015 1
-
Schedule and Manage Milestones
January, 1 2015 1